Book a 30-Minute Call With Our Certified Consultant
Connect directly with our accredited consultant to get clear answers on
your HubSpot underutilized features, integrations, reporting and automation.
In this Consultation, you can discuss:
HubSpot Consulting Needs
Custom Automation Plan
How to Create a Custom Property in HubSpot
HubSpot custom properties let you collect and manage data specific to your business workflows. While HubSpot provides a wide range of default fields, every organization has its own specific needs. Creating a custom property ensures you can store, segment and report on the exact data that matters most.
If you’re planning a broader CRM setup, you can explore our HubSpot Implementation Services to make sure your account is optimized from day one.
Why Custom Properties Matter in HubSpot
In HubSpot, properties are essentially data fields that hold information about your contacts, companies, deals, tickets or custom objects. While built-in properties cover common CRM requirements, they may not capture unique details like “Project Start Date,” “Preferred Communication Channel” or “Membership Status.”
By creating a custom property, you gain the ability to:
Store niche business data in your CRM.
Build targeted lists and workflows based on unique criteria.
Generate more accurate reports.
Improve sales, marketing and service alignment through personalized data points.
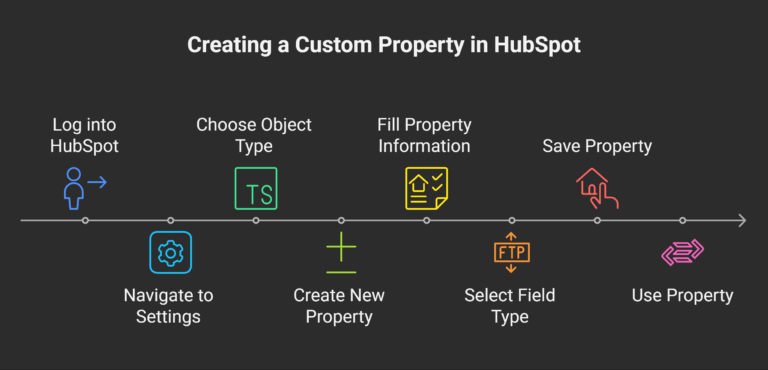
Step-by-Step: How to Create a Custom Property in HubSpot
Below is the exact process for how to create a custom property in HubSpot, whether for contacts, companies, deals or tickets.
Step 1 – Navigate to the Properties Settings
Log into your HubSpot account.
Click the Settings (gear icon) in the main navigation bar.
In the left-hand sidebar menu, go to Properties.
Step 2 – Choose the Object Type
Use the Select an object dropdown at the top.
Choose the record type where you want the custom property:
Contacts – for storing personal details.
Companies – for business information.
Deals – for sales process data.
Tickets – for customer service tracking.
If your goal is how to create custom contact properties HubSpot users often need for lead segmentation, select Contacts.
Step 3 – Create the New Property
Click Create property in the upper right.
Fill out the basic property information:
Object type – Confirm it matches your choice in Step 2.
Group – Select the property group to organize your fields (e.g., “Contact Information” or create a new group).
Label – The property name that appears in HubSpot.
Description – Add context for how and when this field should be used.
Step 4 – Select the Field Type
HubSpot offers multiple field types depending on the kind of data you want to capture:
Single-line text – Short text entries (e.g., Job Title).
Multi-line text – Longer notes or descriptions.
Dropdown select – Predefined list of options.
Multiple checkboxes – Select more than one choice.
Single checkbox – Yes/No field.
Number – Numeric values only.
Date picker – Select a specific date.
File – Upload or link to a file.
Choose the field type carefully, as it determines how the data can be filtered and reported later.
Step 5 – Save and Use the Property
Click Create to save the property.
The new property will now appear on records for the selected object type.
You can use it in:
Forms
Workflows
Filters and views
Reports and dashboards
Best Practices for Managing Custom Properties
Setting up a custom property is simple, but managing it effectively calls for a clear strategy:
Avoid property clutter – Only create fields that have a defined business use.
Standardize naming conventions – Keep property names clear and consistent for easy searching.
Assign ownership – Have one team or person responsible for approving new properties.
Review quarterly – Audit properties regularly to remove unused fields.
Common Use Cases for Custom Properties
Below are some ways businesses successfully use custom properties:
Customer Service – “Service Tier,” “Account Health Score”
Troubleshooting Custom Property Issues
If you create a property and don’t see it in forms, workflows or records, check the following:
The property is assigned to the correct object type.
The property is set to be visible in the record view.
The field type corresponds to the kind of data you intend to gather.
Conclusion
Knowing how to create a custom property in HubSpot empowers your team to store and utilize the right data for your unique processes. When implemented thoughtfully, these properties can significantly improve segmentation, reporting and overall CRM effectiveness.
If you’re looking for expert help setting up advanced property structures, integrating them with automation and aligning them with your business goals, our HubSpot Service can help you get it right the first time.
FAQs
1. Is it possible to edit a custom property in HubSpot after it’s been created? Yes. You can change the label, description and field type for most properties, but changing the type may delete existing data.
2. How many custom properties am I allowed to create in HubSpot? Limits depend on your subscription tier. Professional and Enterprise plans offer more custom properties than Free or Starter plans.
3. Is it possible to delete a custom property in HubSpot? Yes, but deleting a property permanently removes all associated data. Export your data before deletion.
4. Are custom properties available in all HubSpot tools? Most are available across forms, workflows and reports, but some tools may have limitations based on property type.
5. How to create custom contact properties HubSpot users can use in forms? Create the property under the Contact object, then add it as a field in your HubSpot form settings.
I am a certified HubSpot Consultant, Full Stack Developer, and
Integration Specialist with over 15 years of experience successfully transforming
business-critical digital ecosystems. My expertise spans the entire software lifecycle,
ranging from high-performance web application development to managing large-scale
migrations, enterprise-grade CRM integrations, and secure compliance-driven solutions.


 HubSpot Consulting Needs