Book a 30-Minute Call With Our Certified Consultant
Connect directly with our accredited consultant to get clear answers on
your HubSpot underutilized features, integrations, reporting and automation.
In this Consultation, you can discuss:
HubSpot Consulting Needs
Custom Automation Plan
Tracking where your leads originate from is one of the most important steps in understanding and improving your marketing performance. As a HubSpot admin Mpire Solutions specializes in HubSpot consulting you can easily set up and manage lead sources to gain complete visibility into your marketing ROI.
This article explains how to add a lead source in HubSpot, why it matters, and how teams use it to identify their highest-converting channels.
Why Lead Source Tracking Matters
When companies don’t define lead sources properly, they often face problems such as:
Unclear attribution — sales and marketing teams can’t tell which campaigns drive qualified leads.
Missed opportunities — budget goes to under-performing channels.
Broken reporting — HubSpot dashboards show incomplete or duplicate data.
For example, a B2B SaaS company running ads on Google Ads and LinkedIn noticed that both were tagged as Other. After adding distinct lead source properties in HubSpot, they discovered LinkedIn generated 3× more SQLs leading to a re-allocation of ad spend and a measurable rise in ROI.
Understanding Lead Sources in HubSpot
In HubSpot, a lead source is a property that identifies how a contact first entered your database. By default, HubSpot uses the property Original Source, which includes values like Organic Search, Paid Search, Social Media, Email Marketing, Referrals, Direct Traffic, and Offline Sources.
However, you may want custom lead sources such as Webinar Signup, Trade Show, or Partner Referral. That’s where creating a new lead-source property becomes essential.
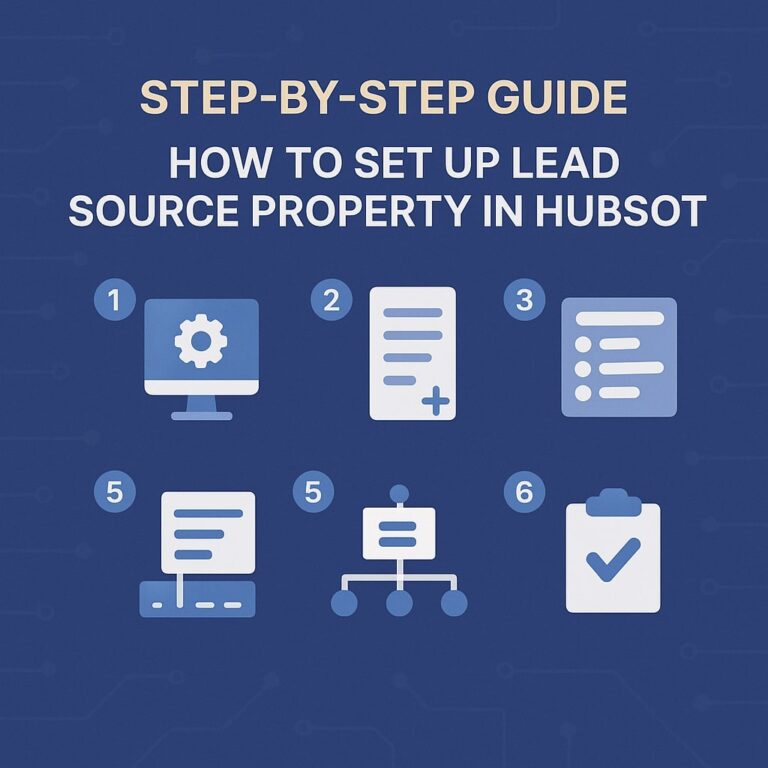
How to Add a Lead Source in HubSpot (Step by Step)
Step 1: Go to HubSpot Settings
In your HubSpot account, click the Settings icon in the main navigation bar.
Select Properties under the Data Management section.
Step 2: Create a New Property
Click Create property in the upper right corner.
Choose:
Object: Contact (since lead sources are contact-based)
Group: Contact Information
Label: Lead Source (or a more specific name)
Click Next to proceed.
Step 3: Choose Field Type
Select Dropdown select as the field type. This allows you to define standardized lead-source options your team can easily choose from. Examples include website form submission, paid campaign, referral partner, event or webinar, and manual entry for sales-generated leads.
Step 4: Add Property Options
When adding your options, keep them short and clear. For example, you might include options like Google Ads, LinkedIn Ad, Referral Partner, Webinar, or Manual Entry. Each of these represents a distinct marketing channel or lead source your business wants to track consistently.
Step 5: Map Lead Sources in Forms and Workflows
To ensure every lead is automatically tagged:
Forms: Add a hidden field that assigns a value such as Website Form.
Workflows: Create automation rules like If Contact Created from LinkedIn Ad → Set Lead Source = LinkedIn Ad.
Step 6: Test and Validate
Before rolling it out, create test contacts from different lead sources for instance, submit a form or import a contact file.
Verify that each contact’s Lead Source property populates correctly in the record.
How to Create a New Lead Source in HubSpot Reports
Once your property is ready, use it in reports to visualize performance.
Go to Reports › Create Report.
Select Single Object › Contacts.
Add Lead Source as a filter or dimension.
Break down your contacts or deals by lead source to see which channels perform best.
Pro Tip: Combine your Lead Source property with Lifecycle Stage to identify which sources produce the highest-quality leads and closed deals.
Real-Life Example
At Mpire Solutions, a manufacturing client struggled to differentiate trade show leads from digital campaign leads. Both were grouped under Offline Sources.
After creating custom lead sources and updating form workflows, HubSpot reporting revealed that trade-show leads converted 25% higher than digital ad leads. That insight shifted their budget allocation and increased ROI within two quarters.
Best Practices for Managing Lead Sources
Keep it simple: Limit your lead source list to 5–10 active options.
Review quarterly: Retire outdated campaign names or inactive channels.
Automate wherever possible: Use workflows to eliminate manual errors.
Get sales and marketing alignment: Make sure both teams agree on lead source definitions.
Integrate systems: Sync lead sources with campaign IDs for better ROI tracking.
Troubleshooting Common Issues
1. My lead source is blank
If a contact doesn’t show a lead source, your form or workflow might not be populating the property. Double-check automation triggers.
2. I can’t find the lead source in reports
Ensure the property is under Contact Information and that you’ve included it as a visible field in reporting filters.
3. Imported contacts don’t show sources
Add a column named Lead Source in your import file and map it correctly during the import process.
Why You Should Customise Lead Sources
Default HubSpot properties work for standard tracking, but customized sources reveal far more actionable insights:
B2B SaaS companies can distinguish between partner referrals and paid media leads.
E-commerce brands can differentiate traffic from influencers vs. paid ads.
Service agencies can see whether RFP submissions or word-of-mouth drive more opportunities.
Nonprofits can identify which events or campaigns inspire the most donations.
HubSpot Administration Role in Lead Source Management
Your HubSpot administration plays a vital role in ensuring lead source data remains clean and consistent. They handle property creation, manage workflows, validate data accuracy, and educate teams on using lead sources effectively.
Maintaining this structure ensures marketing attribution is accurate and executives can make informed, data-driven budget decisions.
When to Work with a HubSpot Consultant
If your CRM setup spans multiple marketing platforms like Google Ads, LinkedIn, or Meta, working with experts such as Mpire Solutions helps you:
Audit your current lead-source setup.
Create consistent property naming conventions.
Automate mappings between platforms.
Build insightful, ROI-focused dashboards.
Key Takeaways
Use custom properties to define accurate lead sources.
Map those sources in forms and workflows to automate tagging.
Review data regularly for consistency.
Combine source and lifecycle stage data for better ROI tracking.
Work closely with your HubSpot administration to maintain clean CRM data.
Understanding how to add a lead source in HubSpot equips your marketing and sales teams with actionable insights into lead performance. With proper setup, automation, and continuous monitoring guided by your HubSpot administration or experts from Mpire Solutions you can transform your CRM data into precise, revenue-driving intelligence.
FAQs
Go to Settings › Properties › Create Property, choose Dropdown Select, name it Lead Source, and assign options via forms or workflows.
To add a lead in HubSpot, go to the Contacts section, click Create contact, and fill in details like name, email, and lead source. You can also import leads in bulk through a CSV file or capture them automatically using forms and integrations.
The lead source field in HubSpot identifies where a contact came from, such as a website form, paid ad, referral, or event. It helps track the effectiveness of marketing channels and measure campaign performance.
Leads are generated through various channels, including website forms, email marketing campaigns, social media advertising, events, and customer referrals. Using HubSpot tools, businesses can capture, qualify, and track leads automatically across multiple channels.
“Specify lead source” means defining how a lead entered your database for example, via an ad, organic search, or partner referral. This helps in accurate tracking, reporting, and understanding which channels drive the best results.
I am a certified HubSpot Consultant, Full Stack Developer, and
Integration Specialist with over 15 years of experience successfully transforming
business-critical digital ecosystems. My expertise spans the entire software lifecycle,
ranging from high-performance web application development to managing large-scale
migrations, enterprise-grade CRM integrations, and secure compliance-driven solutions.


 HubSpot Consulting Needs